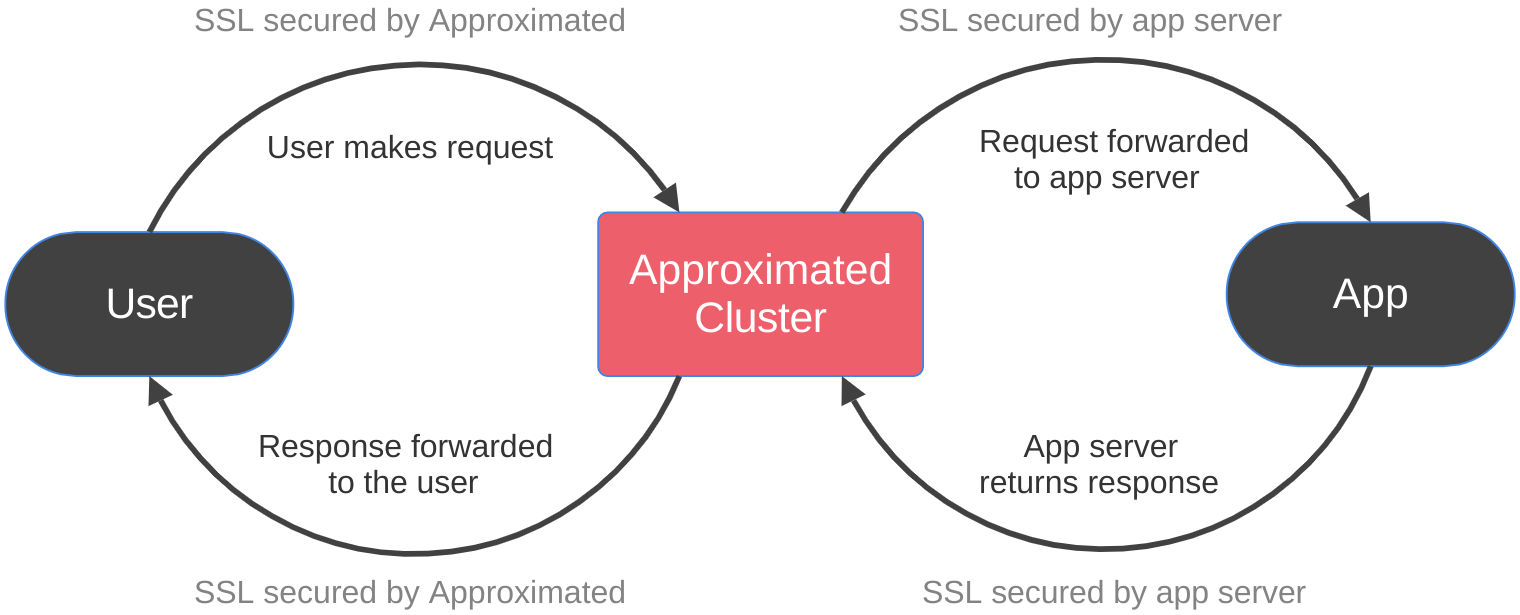
Approximated helps you connect web domains to your application(s). These are often called custom domains when provided by your users.
This is accomplished by relaying internet traffic to your app(s) and back again for each domain that you configure, using a gloablly distributed set of machines called a Proxy Cluster.
This Proxy Cluster also provides and manages SSL certificates for each domain it's responsible for.
Approximated's Proxy Clusters are groups of machines distributed globally that serve traffic for you.
When you create one in Approximated, these machines are set aside and dedicated to you, along with your own dedicated IPv4 address.
You can create Virtual Hosts on your Proxy Cluster to tell it which domains to accept traffic from, and where to send it.
You can have as many Proxy Clusters as you need, and each one can scale to as many custom domains as you want.
Virtual hosts are entities that you create in Approximated.
They tell Approximated how to route requests
for custom domains. Each virtual host has an incoming address
field that matches the custom domain you want to route. It also
has a target address field that tells Approximated where to send
requests for that custom domain.
Every custom domain you want to connect needs to be pointed with
DNS at your Approximated proxy cluster, so that it can route them for
you. This can be done with an A record pointed at your cluster's
IPv4 address, or through an intermediary domain/subdomain with a
CNAME record.
If a DNS record is pointed at your cluster without a matching
virtual host, it will be ignored so that you control what custom
domains are routed by your cluster.
Choosing A records or CNAME records
Apex domains
An apex domain is a plain domain without www or any subdomains prepended.
Example apex domains: mydomain.com, google.com
These are not apex domains: www.mydomain.com, docs.google.com
DNS A records
The simplest way to point a domain at your cluster is a DNS A record,
but you should be aware of a few things:
If you ever choose to change to a different IP address, you
will need to have all custom domains change their A records
individually.
A records are the only broadly supported record type that allow pointing an apex domain (no
subdomain or www prepending it). CNAME records do not.
Example: customdomain.com (A record)
your cluster IP address
Using an intermediary with CNAMEs
Another option is to point an intermediary domain or subdomain
that you control at your cluster with an A record, and then have
custom domains point at the intermediary with a CNAME.
There are
a few things to know about this method:
Requests to custom domains will follow the CNAME and point
wherever your intermediary is pointed.
You can re-point all custom domains pointed this way at once
by changing the intermediary domain/subdomain.
Public DNS spec only allows CNAME records to point a subdomain
at another domain or subdomain. You can't point an apex
record using a CNAME, so it will need to have
a subdomain or www prepending it.
This will work:
www.customdomain.com (CNAME)
domains.myapp.com (A record)
your cluster IP address
This will not work because it points an apex domain with a CNAME:
customdomain.com (CNAME)
domains.myapp.com (A record)
your cluster IP address
TL;DR
If you're okay with your custom domains all having www or having another subdomain, use an intermediary domain with CNAMEs. Otherwise, use A records.
Approximated requires an private API key to accept API requests
from your application. This API key should never be made public or
added to client-side javascript code.
You can create or get an existing API key from the dashboard, and
add it to all API requests under the request header "api-key".
The virtual hosts API is how your application will interface
directly with Approximated. You can use it to automate custom
domains as needed. There are currently 6 endpoints:
create, list, read, update, bulk update, and delete.
Note:
Make sure that you include headers for
Content-Type and Accept set to 'application/json' for all requests to the API,
and be sure to include your API key under the header api-key.
In Approximated, a virtual host represents a custom domain mapping. It defines how a custom domain
(like "yourcustomdomain.com") should be routed to your application's actual domain (like "yourapp.com").
Virtual hosts are the core configuration objects in Approximated,
and are automatically tied to a proxy cluster by the API key used to create them.
Each virtual host contains the following fields:
Core Fields
id
The unique identifier for the virtual host.
incoming_address
The custom domain that points to Approximated (e.g., "yourcustomdomain.com").
target_address
The destination where requests should be routed (e.g., "yourapp.com").
When load balancing is enabled, this becomes the first upstream.
target_ports
The port(s) to use for the target. Default is "443" for HTTPS traffic.
keep_host
Controls whether the original Host header is preserved (true) or changed to the target address (false).
When null, uses the cluster default setting.
Load Balancing Fields
lb_enabled
Boolean that indicates whether load balancing is enabled for this virtual host.
lb_policy
The policy for distributing requests: "first", "random", "round_robin", or "least_conn".
lb_sticky
Boolean that indicates whether to maintain user connections to the same upstream server using cookies.
upstreams
Array of additional servers for load balancing, each with id, host, port, and enabled properties.
The target_address is automatically included as the first upstream.
Monitoring Fields
created_at
Timestamp when the virtual host was created.
has_ssl
Boolean indicating whether SSL is active for the domain.
is_resolving
Boolean indicating whether the domain is resolving correctly.
ssl_active_from
The start of the validity period for the SSL certificate.
ssl_active_until
The ending of validity period for the SSL certificate.
status
Current combined status code, such as ACTIVE_SSL.
Generally it's better to use apx_hit and has_ssl
to determine if a custom domain is successfully connected.
status_message
Current human-readable status description.
dns_pointed_at
The IP address the custom domain currently points to.
apx_hit
Boolean indicating whether requests are successfully reaching the Approximated cluster.
last_monitored_unix
A unix timestamp of the last monitoring check.
last_monitored_humanized
The human-readable time of the last monitoring check.
Not all fields are returned in every API response, and some fields (like monitoring data) are only available for existing virtual hosts.
The sections below detail the endpoints for creating, listing, reading, updating, and deleting virtual hosts through the API.
Creating a virtual host is done with a JSON POST request to the
Approximated API. It can be created at any time before or after
the custom domain is pointed at the cluster with a DNS record.
POST
https://cloud.approximated.app/api/vhosts
Returns
201 - Successfully created
// Example response:
{
"data": {
  "id": 445922,
  "incoming_address": "acustomdomain.com",
  "target_address": "myapp.com",
  "target_ports": "443",
  "keep_host": null,
  "lb_policy": "round_robin",
  "lb_enabled": true,
  "lb_sticky": false,
  "upstreams": [
    {
      "id": 123,
      "host": "myapp.com",
      "port": 443,
      "enabled": true
    },
    {
      "id": 124,
      "host": "server2.example.com",
      "port": 443,
      "enabled": true
    }
  ],
  "user_message": "In order to connect your domain, you'll need to have a DNS A record that points acustomdomain.com at 213.188.210.168. If you already have an A record for that address, please change it to point at 213.188.210.168 and remove any other A records for that exact address. It may take a few minutes for your SSL certificate to take effect once you've pointed your DNS A record."
}
}
422 - Validation errors
// Example response
{
"errors": {
  "incoming_address": [
    "This incoming address has already been created on the cluster you selected."
  ],
  "upstreams": [
    {
      "params": {
        "host": "",
        "port": 0,
        "enabled": true
      },
      "index": 0,
      "errors": {
        "host": ["can't be blank"],
        "port": ["must be greater than 0"]
      }
    }
  ]
}
}
401 - The API key used does not exist
Fields
incoming_address
Required
String
The custom domain that you'd like to route.
Example: acustomdomain.com
target_address
Required
String
The address that you'd like requests for the custom domain
to be routed to. Typically another domain or domain with a
sub-page.
If load balancing is enabled, this will be used as the first upstream
in the load balancing pool.
Example: myapp.com, myapp.com/some/page
target_ports
Optional
String
Default: "443"
This sets the port that you'd like requests to arrive at
on the target address. By default it is port 443 as that
is the port that web traffic secured by SSL is typically
served from.
Example: 443, 80, 8080 (string)
redirect
Optional
Boolean
Default: false
Set this to true if you'd like to have requests be 301
redirected to the target address instead of proxied.
Note: redirects need to have the protocol (http:// or
https://) included in the target_address, or they will be
appended to the incoming address.
Example: true or false (boolean)
exact_match
Optional
Boolean
Default: false
Set this to true if you'd like to have requests that
exactly match the incoming address, including paths, be
overridden and routed somewhere specific. Typically this
is used in combination with another virtual host
configured for the base custom domain.
Note: this will ignore any extra user-added paths or
queries if it matches, and will override any other virtual
hosts for the same domain that don't exactly match.
Example: true or false (boolean)
redirect_www
Optional
Boolean
Default: false
For convenience, when set to true, Approximated will create a second virtual host as well that will 301 redirect the www version of the incoming address to this address.
Note: www redirects to an existing virtual host will not count towards your billable hosts.
Example: true or false (boolean)
keep_host
Optional
Boolean
Default: null (uses cluster default)
Set this to true if you'd like the Host header to be left as the incoming address (the custom domain) for this virtual host.
Set to false if you'd like to override the cluster default setting for this, or null if you'd like to use the default setting.
Note: when set to false, either by default or when explicitly set here,
your cluster will change the Host header for each request to the target address by default.
This can often avoid issues with servers/reverse proxies out of the box.
Example: true, false, null (boolean)
lb_enabled
Optional
Boolean
Default: false
Set this to true to enable load balancing for this virtual host. When enabled,
requests will be distributed across multiple upstreams according to the selected load balancing policy.
Note: When load balancing is enabled, the target_address will automatically be used
as the first upstream in the load balancing pool.
Example: true or false (boolean)
lb_policy
Optional
String
Default: "first"
The load balancing policy to use when distributing requests across upstreams.
Only applicable when lb_enabled is true.
Available policies:
first - Select first healthy upstream in the list
random - Randomly select a healthy upstream
round_robin - Distribute evenly in a round robin sequence
least_conn - Select healthy upstream with fewest connections
Example: "round_robin"
lb_sticky
Optional
Boolean
Default: false
When set to true, attempts to keep users connected to the same upstream
once they've been assigned to one. This uses a cookie to track which upstream
the user should connect to.
The first connection uses the lb_policy to select an upstream. If that upstream
becomes unhealthy, a new one will be selected using the lb_policy again.
Example: true or false (boolean)
upstreams
Optional
Array of Objects
An array of additional upstream servers to include in the load balancing pool.
Only used when lb_enabled is true.
Note: The target_address will always be used as the first upstream.
If the target_address contains a path, that path will be automatically
prepended to the path for all upstreams as well.
Each upstream object requires:
host - The hostname of the upstream server
port - The port of the upstream server (usually 443 for HTTPS)
We use a cursor based pagination system to page through your virtual hosts, up to 20 at a time.
You can get the first page of the list by calling the first endpoint below, without a cursor.
You'll receive back a JSON object with a data field that contains the list of virtual hosts, as well as an after_cursor and before_cursor.
You can then get the next or previous page by calling the endpoints below with the after or before cursor from the current results.
// Example response
{
"data": [
  {
    "apx_hit": true, // requests are reaching the cluster
    "created_at": "2023-04-03T17:59:28", // UTC timezone
    "dns_pointed_at": "213.188.210.168", // DNS for the incoming_address
    "has_ssl": true,
    "id": 405455,
    "incoming_address": "acustomdomain.com",
    "is_resolving": true, // is this returning a response
    "last_monitored_humanized": "1 hour ago",
    "last_monitored_unix": 1687194590,
    "ssl_active_from": "2023-06-02T20:19:15", // UTC timezone
    "ssl_active_until": "2023-08-31T20:19:14", // UTC timezone, auto-renews
    "status": "ACTIVE_SSL",
    "status_message": "Active with SSL",
    "target_address": "myapp.com",
    "target_ports": "443",
    "keep_host": null,
    "lb_policy": "round_robin",
    "lb_enabled": true,
    "lb_sticky": false,
    "upstreams": [
      {
        "id": 123,
        "host": "myapp.com",
        "port": 443,
        "enabled": true
      },
      {
        "id": 124,
        "host": "server2.example.com",
        "port": 443,
        "enabled": true
      }
    ]
  },
  // More virtual hosts...
],
"after_cursor": "a39fdk32kf", // will be null if there is no next page
"before_cursor": "lf3jeuc3406" // will be null if there is no previous page
}
401 - The API key used does not exist
The monitoring fields and statuses are from the latest monitoring results. A fresh check is not performed for the list before responding, and it cannot be force checked like an individual virtual host.
Use a GET request with the incoming_address at the end of the URL to retrieve the details of a single Virtual Host.
If that Virtual Host was created with the API Key included in the header, it's details will be returned.
Note: to get by incoming incoming address, it must not include paths, query strings, or a protocol like https:// in the incoming address value.
If you've included those in the virtual host you'd like to get, please use the alternative POST endpoint below that takes a JSON object with incoming_address instead.
// Example response
{
"data": {
  "apx_hit": true, // requests are reaching the cluster
  "created_at": "2023-04-03T17:59:28", // UTC timezone
  "dns_pointed_at": "213.188.210.168", // DNS for the incoming_address
  "has_ssl": true,
  "id": 405455,
  "incoming_address": "acustomdomain.com",
  "is_resolving": true, // is this returning a response
  "last_monitored_humanized": "1 hour ago",
  "last_monitored_unix": 1687194590,
  "ssl_active_from": "2023-06-02T20:19:15", // UTC timezone
  "ssl_active_until": "2023-08-31T20:19:14", // UTC timezone, auto-renews
  "status": "ACTIVE_SSL",
  "status_message": "Active with SSL",
  "target_address": "myapp.com",
  "target_ports": "443",
  "keep_host": null,
  "lb_policy": "round_robin",
  "lb_enabled": true,
  "lb_sticky": false,
  "upstreams": [
    {
      "id": 123,
      "host": "myapp.com",
      "port": 443,
      "enabled": true
    },
    {
      "id": 124,
      "host": "server2.example.com",
      "port": 443,
      "enabled": true
    }
  ]
}
}
404- Could not find Virtual Host with that API key
401 - The API key used does not exist
In order to avoid spamming your custom domains with monitoring checks every time you call this endpoint,
Approximated returns the results of the most recent recorded status check, which may be out of date.
If you'd prefer to have it check again before responding,
you can add /force-check to the end of the endpoint URL. This may take up to 30 seconds if the domain DNS is not pointed yet,
and is rate limited to minimize accidentally DDOSing your application.
Updating a virtual host is done with a JSON POST request to the
Approximated API. It can be updated at any time before or after
the custom domain is pointed at the cluster with a DNS record.
Any optional fields not submitted will remain the same as they were previously.
// Example response
{
"data": {
  "apx_hit": true, // requests are reaching the cluster
  "created_at": "2023-04-03T17:59:28", // UTC timezone
  "dns_pointed_at": "213.188.210.168", // DNS for the incoming_address
  "has_ssl": true,
  "id": 405455,
  "incoming_address": "adifferentcustomdomain.com",
  "is_resolving": true, // is this returning a response
  "last_monitored_humanized": "1 hour ago",
  "last_monitored_unix": 1687194590,
  "ssl_active_from": "2023-06-02T20:19:15", // UTC timezone
  "ssl_active_until": "2023-08-31T20:19:14", // UTC timezone, auto-renews
  "status": "ACTIVE_SSL",
  "status_message": "Active with SSL",
  "target_address": "myapp.com",
  "target_ports": "443",
  "keep_host": true,
  "lb_policy": "least_conn",
  "lb_enabled": true,
  "lb_sticky": false,
  "upstreams": [
    {
      "id": 123,
      "host": "myapp.com",
      "port": 443,
      "enabled": true
    },
    {
      "id": 125,
      "host": "backup-server.example.com",
      "port": 443,
      "enabled": true
    }
  ]
}
}
422 - Validation errors
// Example response
{
"errors": {
  "incoming_address": [
    "This incoming address has already been created on the cluster you selected."
  ],
  "upstreams": [
    {
      "params": {
        "host": "",
        "port": 0,
        "enabled": true
      },
      "index": 0,
      "errors": {
        "host": ["can't be blank"],
        "port": ["must be greater than 0"]
      }
    }
  ]
}
}
404 - Could not find an existing Virtual Host with that incoming address
401 - The API key used does not exist
Fields
current_incoming_address
Required
String
The custom domain for an existing Virtual Host.
Example: acustomdomain.com
incoming_address
Optional
String
A new custom domain you would like to change the existing Virtual Host to.
Example: adifferentcustomdomain.com
target_address
Optional
String
The address that you'd like requests for the custom domain
to be routed to. Typically another domain or domain with a
sub-page.
If load balancing is enabled, this will be used as the first upstream
in the load balancing pool.
Example: myapp.com, myapp.com/some/page
target_ports
Optional
String
Default: "443"
This sets the port that you'd like requests to arrive at
on the target address. By default it is port 443 as that
is the port that web traffic secured by SSL is typically
served from.
Example: 443, 80, 8080 (string)
redirect
Optional
Boolean
Default: false
Set this to true if you'd like to have requests be 301
redirected to the target address instead of proxied.
Note: redirects need to have the protocol (http:// or
https://) included in the target_address, or they will be
appended to the incoming address.
Example: true or false (boolean)
exact_match
Optional
Boolean
Default: false
Set this to true if you'd like to have requests that
exactly match the incoming address, including paths, be
overridden and routed somewhere specific. Typically this
is used in combination with another virtual host
configured for the base custom domain.
Note: this will ignore any extra user-added paths or
queries if it matches, and will override any other virtual
hosts for the same domain that don't exactly match.
Example: true or false (boolean)
redirect_www
Optional
Boolean
Default: false
For convenience, when set to true, Approximated will create a second virtual host as well that will 301 redirect the www version of the incoming address to this address.
Note: www redirects to an existing virtual host will not count towards your billable hosts.
Example: true or false (boolean)
keep_host
Optional
Boolean
Default: null (uses cluster default)
Set this to true if you'd like the Host header to be left as the incoming address (the custom domain) for this virtual host.
Set to false if you'd like to override the cluster default setting for this, or null if you'd like to use the default setting.
Note: when set to false, either by default or when explicitly set here,
your cluster will change the Host header for each request to the target address by default.
Setting this to false can often avoid issues with servers/reverse proxies out of the box,
but you'll need to use the apx-incoming-host header in your app to determine the custom domain.
Example: true, false, null (boolean)
lb_enabled
Optional
Boolean
Default: false
Set this to true to enable load balancing for this virtual host. When enabled,
requests will be distributed across multiple upstreams according to the selected load balancing policy.
Note: When load balancing is enabled, the target_address will automatically be used
as the first upstream in the load balancing pool.
Example: true or false (boolean)
lb_policy
Optional
String
Default: "first"
The load balancing policy to use when distributing requests across upstreams.
Only applicable when lb_enabled is true.
Available policies:
first - Select first healthy upstream in the list
random - Randomly select a healthy upstream
round_robin - Distribute evenly in a round robin sequence
least_conn - Select healthy upstream with fewest connections
Example: "round_robin"
lb_sticky
Optional
Boolean
Default: false
When set to true, attempts to keep users connected to the same upstream
once they've been assigned to one. This uses a cookie to track which upstream
the user should connect to.
The first connection uses the lb_policy to select an upstream. If that upstream
becomes unhealthy, a new one will be selected using the lb_policy again.
Example: true or false (boolean)
upstreams
Optional
Array of Objects
An array of additional upstream servers to include in the load balancing pool.
Only used when lb_enabled is true.
Note: The target_address will always be used as the first upstream.
If the target_address contains a path, that path will be automatically
prepended to the path for all upstreams as well.
Important: Providing this field will replace ALL existing upstreams.
If you want to add new upstreams while keeping existing ones, you should
first retrieve the current upstreams with the Read endpoint.
Each upstream object requires:
host - The hostname of the upstream server
port - The port of the upstream server (usually 443 for HTTPS)
This endpoint allows you to update multiple virtual hosts at once with the same settings.
It's useful when you need to change settings across many domains simultaneously, such as updating
the target address for all domains in a batch.
You can update up to 100 virtual hosts in a single request. If more than 100 domains are provided,
only the first 100 unique domains will be processed.
// Example response for validation errors
{
  "errors": {
    "target_address": ["can't be blank"],
    "upstreams": [
      {
        "params": {
          "host": "",
          "port": 0,
          "enabled": true
        },
        "index": 0,
        "errors": {
          "host": ["can't be blank"],
          "port": ["must be greater than 0"]
        }
      }
    ]
  }
}
400 - Bad request format
// Example response for bad request
{
  "error": "Invalid incoming_addresses: must be a list"
}
401 - The API key used does not exist
Fields
incoming_addresses
Required
Array of Strings
A list of domain names (incoming addresses) that you want to update.
Duplicates will be automatically removed, and a maximum of 100 domains will be processed.
An object containing the fields you want to update for all the specified domains.
This can include any of the standard virtual host properties (except for incoming_address,
which cannot be updated in bulk).
If you want to update load balancing upstreams for all the specified domains,
include this array of upstream objects. Each object should contain host, port,
and enabled fields.
Note: Including this field will replace ALL existing upstreams for the virtual hosts.
If you set this to an empty array, it will delete all existing upstreams.
Set this to true to enable load balancing for all the specified domains.
When enabled, requests will be distributed across the target_address and any
additional upstreams provided.
Example: true
updates.lb_policy
Optional
String
The load balancing policy to use for distributing requests.
Available options: "first", "random", "round_robin", "least_conn"
Example: "round_robin"
updates.lb_sticky
Optional
Boolean
When enabled, attempts to keep users connected to the same upstream
once they've been assigned one. Uses a cookie for tracking.
Use a DELETE request with the incoming_address or with the virtual host ID, to remove a single Virtual Host.
Note: to delete by incoming incoming address, it must not include paths, query strings, or a protocol like https:// in the incoming address value.
If you've included those in the virtual host you'd like to delete, please use the alternative POST version of this endpoint that takes a JSON request object with a field for incoming_address instead.
Virtual hosts can have different status codes that indicate their current state based on a variety of montoring checks.
These are provided as a convenience, but may not be as granular as combining the various fields available
within the virtual host response object yourself.
Note: this list may be added to in the future as we improve monitoring further,
but existing statuses will not be deprecated without a new major API version release.
ACTIVE_SSL
Requests to his virtual host are reaching the cluster, it's DNS is pointed correctly, it has an active SSL certificate, and has no known issues.
ACTIVE_SSL_PROXIED
Requests to this virtual host are reaching the cluster despite being pointed elsewhere with DNS, which means it's likely being proxied through somewhere else first. It has an active SSL certificate and no known issues.
ACTIVE_NO_SSL
Requests to this virtual host are reaching the cluster, but an SSL certificate has not yet been issued for it. This status is very rare and likely to be very short lived.
TARGET_NOT_LOADING
Requests to this virtual host are reaching the cluster but the upstream target is not responding.
DNS_INCORRECT
Requests to this virtual host are not reaching the cluster, and it's DNS appears to be pointed elsewhere.
DNS_NOT_RESOLVING
Requests to this virtual host are not reaching the cluster and it appears to have no DNS records set at all.
UNKNOWN
We are not able to determine a reliable status for this virtual host at this time, but will keep trying. This status is very rare and likely to be short lived.
The DNS checks API allows you to check if DNS records exist for a domain or subdomain.
It's provided as a convenience for your application, for scenarios like:
Ensuring a user has pointed an A or CNAME record.
Using TXT records to validate domain ownership.
Helping you to support/debug DNS issues for your users.
Note:
Make sure that you include headers for
Content-Type and Accept set to 'application/json' for all requests to the API,
as well as including an Api-Key header with a current API key.
Send a JSON POST request to the Approximated API with a list of
data to compare against DNS records. Determines if an address
has exactly one matching record for each data object in the list.
This check returns the list back to you with the results for 'match' and 'actual_values' injected into each object.
The 'match' field will only be true if there is exactly one DNS record/value for each address,
and it must exactly match the 'match_against' value you've set.
The address of the record you want to check. Typically
a domain/subdomain. Do not use placeholders like @ that you
may see in DNS dashboards, but rather the complete address.
Example: myapp.com, subdomain.myapp.com
record[type]
Required
String
The DNS record type you'd like to check, formatted
as a lowercase string.
Example: "a", "cname", "ns", "txt"
record[match_against]
Required
String
This is the value that you'd like the record value to be compared against.
The value here can be any string, as all record values will be converted to strings.
Note: there can be multiple records/values for the same address.
This endpoint will only return "match": true if there is exactly one record,
and that record exactly matches this field.
Send a JSON POST request to the Approximated API with a list of
data you'd like to check against the DNS records of an address.
DNS allows multiple records for the same address,
and you may wish to check that at least one of them matches while disregarding the rest.
This check is for that purpose.
The data list is returned back to you with injected fields for 'match' and 'actual_values'.
The 'match' field will be true if there is any record/value that matches the 'match_against' field,
regardless of how many other records/values there may be for that address.
The address of the record you want to check. Typically
a domain/subdomain. Do not use placeholders like @ that you
may see in DNS dashboards, but rather the complete address.
Example: myapp.com, subdomain.myapp.com
record[type]
Required
String
The DNS record type you'd like to check, formatted
as a lowercase string.
Example: "a", "cname", "ns", "txt"
record[match_against]
Required
String
This is the value that you'd like the record value to be compared against.
The value here can be any string, as all record values will be converted to strings.
Note: there can be multiple records/values for the same address.
This endpoint will return "match": true if any one of them matches.
We've created an optional DNS widget that's embeddable into your app, to help your users update their DNS records when connecting a custom domain.
The DNS widget detects the DNS provider and offers an automatic setup option where a supported provider integration is available.
Provider-specific manual instructions are also available. Automation depends on the provider and requested record configuration.
We've tried to make the DNS widget easily compatible with as many different stacks and approaches as possible.
The setup below uses embedded v2 with a scoped customer token, powered by the headless API.
Load the headless client, then the embedded v2 renderer:
Then call the widget init function after the container exists. Replace the documentation address 192.0.2.10 with your cluster IPv4 address. The example configures the apex A record and a CNAME at www; {domain} is replaced with the domain entered by the customer.
// Create the config data for the widget.
const apx_dns_widget_config = {
    // Generate a scoped token on your server with GET /api/dns/v2/token.
    token: "use_token_api_endpoint_server_side_to_generate_this",
    api_url: "https://cloud.approximated.app/api/dns/v2",
    /*
    * The dnsRecords field is an array of record objects
    * that you'd like to have applied to custom domains.
    *
    * These will likely be A records pointing at your cluster IP address,
    * or CNAME records pointing at an intermediary domain you control.
    * The dnsRecords always consist of:
    *      - [string]  type (Uppercase DNS record type like A, CNAME, or TXT)
    *      - [string]  host (Use @ for the apex domain or a subdomain with no trailing dot)
    *      - [string]  value (the address, value, text, etc. for that record type)
    *      - [integer] ttl (how many seconds the record should be cached in DNS servers)
    * We currently allow setting A, CNAME, and TXT records with the DNS widget.
    */
    dnsRecords: [
        {
            type: "A",
            host: "@",
            value: "192.0.2.10",
            ttl: 3600,
        },
        {
            type: "CNAME",
            host: "www",
            value: "{domain}",
            ttl: 3600,
        }
    ],
    // domain: "example.com", // optional, skips the domain entry UI step
    // prefillDomain: "example.com", // optional, prefills the domain without skipping
    verifyAutoScroll: true // optional, auto-scroll to verification results. Default: true
};

// Call the DNS widget init function to launch the widget.
// In this example we call it after the DOM content is loaded.
document.addEventListener("DOMContentLoaded", function(event) {
    // The DNS widget functions/data are automatically namespaced
    // and available from window.apxDns.
    window.apxDns.init(apx_dns_widget_config);
});
Optionally, set javascript listeners to call some of your own logic based on widget events.
// When the user submits a domain in the UI
document.addEventListener('apx-dnswidget-user-submitted-domain', function(event) {
    // Your code to handle the event.
    // The event.detail string contains the custom domain/subdomain
    // submitted by the user into the UI.
});

// When the widget flow is restarted
document.addEventListener('apx-dnswidget-restarted', function(event) {
    // Your code to handle the event.
});

// When all of the records are completely verified as updated successfully
document.addEventListener('apx-dnswidget-records-completely-verified', function(event) {
    // Your code to handle the event.
    // The event.detail will contain the record results as a list of objects
});

// When none of the records match the desired updates, during verification
document.addEventListener('apx-dnswidget-records-failed-verification', function(event) {
    // Your code to handle the event.
    // The event.detail will contain the record results as a list of objects
});

// When only some of the records are verified as updated successfully
document.addEventListener('apx-dnswidget-records-partially-verified', function(event) {
    // Your code to handle the event.
    // The event.detail will contain the record results as a list of objects
    console.log(event.detail);

    // the output of the console.log above could look like this:
    [
        {
            actual_values: [
                "192.0.2.10"
            ],
            apex: "example",
            combined_host: "@",
            domain: "example.com",
            full: "example.com",
            host: "@",
            match: true, // Approximated found an exact match DNS record
            match_against: "192.0.2.10", // The value to match against the DNS record
            non_tld: "example",
            subdomain: null,
            tld: "com",
            type: "A"
        },
        {
            actual_values: false,
            apex: "example",
            combined_host: "www",
            domain: "example.com",
            full: "example.com",
            host: "www",
            match: false, // Approximated could not find a matching DNS record
            match_against: "example.com", // The value to match against the DNS record
            non_tld: "example",
            subdomain: null,
            tld: "com",
            type: "CNAME"
        }
    ]
});
You can optionally stop and clear the widget element or restart the flow.
// Stop and clear the element used for the widget.
// The init function will need to be called again to restart.
window.apxDns.stop()

// Alternatively, you can restart without stopping by calling this function:
window.apxDns.restart()
The widget comes with neutral styling that you can override with your own CSS. Its outermost element fills the available width up to 600px, with no fixed height, padding, or border, so you can fit it into your app.
Explore the Classic, Dark, and Minimal styles to see how CSS can change its appearance.
Every CSS class in the element is prefixed with apxdns-, and the outermost element always has a class of apxdnswidget.
The intention for this is to avoid any class name conflicts with your existing CSS code.
The widget also makes use of CSS variables scoped to the class apxdnswidget to enable easier theming. The available variables and their default values are as follows:
A scoped token is a temporary pass that lets the browser use the DNS widget without seeing your private API key.
Create it on your server, then pass the returned token to the embedded widget or headless client.
Each token is tied to the API key and proxy cluster that created it.
Call the URL below from an authenticated endpoint in your application. Check that the signed-in user is allowed to configure the domain, and send your cluster API key in the api-key header. Keep that key on your server.
GET
https://cloud.approximated.app/api/dns/v2/token
Returns
200 - Success
{
    "token": "a-valid-token"
}
401 - The API key used does not exist
429 - Too many requests; wait before trying again
No fields/data required.
Each token lasts up to 10 minutes and 30 seconds. While the page is open, the client attempts renewal every five minutes.
Renewals keep the same session going for at most 24 hours from its first token; they cannot extend that deadline.
After expiry, restart the setup flow with a fresh token from your authenticated backend.
Deleting or replacing the API key that created a token stops that token and its renewals from working. Use a current key to start a new session. Token creation and renewal return Cache-Control: no-store; return that header from your own token endpoint too.
Use DNS Widget v2 throughout: /api/dns/v2/token creates the token, and instructions, DNS checks, and renewal use /api/dns/v2/. Load headless.v2.js for browser requests. The v2 browser API requires scoped tokens.
Widget tokens allow DNS instructions and checks. They do not prove domain ownership or give the browser permission to change your application’s accounts or domain settings.
Request limits
The following limits apply per minute. A request must fit every applicable limit:
Create tokens: 60 per IP address and 60 per proxy cluster.
Renew tokens: 120 per IP address, 120 per cluster, and 12 per session.
Get instructions: 120 per IP address, 120 per cluster, and 60 per session.
Verify records: 240 per IP address, 240 per cluster, and 120 per session. Exact-match and existence checks share these limits.
Keys for the same cluster share its limit. Renewing a token does not reset its session’s count. Limits are enforced separately on each Approximated application server. Token creation also counts toward the general API limit of 240 requests per minute per key.
Widget limits return HTTP 429 with JSON error rate_limited and Retry-After: 60. Wait 60 seconds before retrying. The general API-key limit can instead return a plain-text 429 response.
Public demos use separate demo tokens: sessions last up to 30 minutes, requests allow one or two records, and instructions use manual setup without saving provider lookups. Use your own scoped customer token for your application, including supported automatic setup.
Build DNS setup into your own interface. Send us the customer’s domain and the records you need; we return their DNS provider, the values to enter, and step-by-step instructions as JSON. You decide how to display them.
Use headless mode when you want to use your own components, layout, or wording. If you’d prefer a complete interface you can drop into a page, start with the embeddable widget.
For a browser integration, use our small JavaScript client. It has no dependencies, leaves the page’s HTML and styles to you, and renews the widget token while the customer works.
First, create an authenticated endpoint in your app that calls GET /api/dns/v2/token with your cluster API key. Have it return { "token": "…" } with Cache-Control: no-store. The examples call your endpoint /api/dns-widget-token; you need to implement it. Keep the API key on your server.
<script src="https://cloud.approximated.app/dnswidget/headless.v2.js"></script>
<script type="module">
  const tokenResponse = await fetch("/api/dns-widget-token", {
    credentials: "same-origin",
    cache: "no-store"
  });
  if (!tokenResponse.ok) throw new Error("Could not start DNS setup");
  const { token } = await tokenResponse.json();
  if (typeof token !== "string" || !token) {
    throw new Error("Your token endpoint returned an invalid token");
  }

  const client = window.apxDnsHeadless.createClient({ token });
  const result = await client.instructions({
    domain: "shop.customer.com",
    records: [
      { type: "CNAME", host: "@", value: "domains.example.com", ttl: 3600 }
    ]
  });
  console.log(result.domains);
</script>
This asks the customer to point shop.customer.com at domains.example.com. Replace both with the domain being connected and your application’s target hostname. Here, @ means the supplied domain itself, including its shop subdomain.
The snippet above logs the instructions. In your application, render them as described below and show a retry message if a request fails. If you prefer to call the API from your backend, skip to the API reference.
Preview the Simple, Dashboard, and Guided designs in your browser, then adapt the v2 starter for your app. You can switch designs without losing your progress. Each public starter includes provider instructions with copy buttons, verification results, retries, and a server endpoint that creates scoped tokens.
Use GitHub’s “Use this template” button or clone the starter for your framework. Open the starter folder and, with Node.js 22.12 or newer installed, run:
npm ci
cp .env.example .env
In .env, set APX_API_KEY to your server API key and VITE_CNAME_TARGET to the hostname customers should point to.
Both starters use headless.v2.js and the /api/dns/v2 API. Their server creates scoped customer tokens automatically. Start the interface:
npm run dev
Open http://127.0.0.1:5173. The API key stays on the Node server; the browser receives a short-lived token. The session code stops renewal when setup ends and ignores responses for a previous domain.
The included server runs locally only. When integrating with your application, move the token endpoint into your authenticated backend and check the customer's permission to configure the domain. Each repository’s README explains the files, configuration, and production integration.
The response groups records by their root domain. For example, records for shop.customer.com and www.customer.com appear together under apex_domain: "customer.com". Each group has a provider object and a records array.
Show provider.message above the records. Add provider.login_url as a link when it’s available.
For each record, use record.title as a heading and render record.steps in order.
Choose how to display each step using its kind, as shown below.
Step kinds
text
Plain instruction
Display text as a sentence, such as “Click the Save button to save changes”.
link
Instruction with a link
Display text as a link to url. This usually opens the provider’s DNS settings.
field
Value the customer enters
Show text, the provider’s field label, and a copyable value. The field key tells you whether it is the host, value, or TTL.
For this step, your UI could show Name: shop. Use the step’s value for display: it already accounts for the provider’s conventions. An empty string means “leave this field blank”, and a TTL may be written as “1 Hour”. Render returned text as text, using your framework’s escaping or textContent.
If record.automation is present, you can also offer its url as an automatic setup link. Keep the manual steps available. A detected provider does not necessarily support automation; show the link only when it is returned.
If the provider can’t be identified, the API still returns general instructions. Use provider.lookup_status to distinguish a successful lookup from missing nameservers or a failed lookup, and give the customer a way to correct the domain or retry.
View the full example response
A 200 response for the CNAME request above, with Cloudflare detected and no automatic setup link available.
{
"domains": [
{
"apex_domain": "customer.com",
"provider": {
"name": "Cloudflare",
"provider_domain": "cloudflare.com",
"detected": true,
"supported": true,
"lookup_status": "ok",
"nameservers": [
"ada.ns.cloudflare.com",
"rob.ns.cloudflare.com"
],
"message": "We've detected Cloudflare as your DNS provider.",
"message_link": null,
"login_url": "https://dash.cloudflare.com/",
"logo_url": null
},
"records": [
{
"domain": "shop.customer.com",
"apex_domain": "customer.com",
"subdomain": "shop",
"type": "CNAME",
"host": "@",
"combined_host": "shop",
"value": "domains.example.com",
"match_against": "domains.example.com",
"ttl": 3600,
"title": "Add a DNS CNAME record for shop.customer.com",
"automation": null,
"steps": [
{
"kind": "link",
"text": "Sign in to Cloudflare.",
"url": "https://dash.cloudflare.com/"
},
{
"kind": "text",
"text": "Select the account for customer.com, then open that domain."
},
{
"kind": "text",
"text": "In \"DNS management for customer.com\", click Add Record."
},
{
"kind": "text",
"text": "Select CNAME as the record type."
},
{
  "kind": "field",
  "field": "host",
  "label": "Name",
  "value": "shop",
  "text": "Set Name to:"
},
{
"kind": "field",
"field": "value",
"label": "Target",
"value": "domains.example.com",
"text": "Set Target to:"
},
{
"kind": "field",
"field": "ttl",
"label": "TTL",
"value": "3600",
"text": "Set TTL to:"
},
{
"kind": "text",
"text": "Click Save to add the record."
}
]
}
]
}
]
}
Once the customer has saved their DNS changes, let them run a check. Pass the original instructions result to client.verify(); the client sends the correct record fields for you. Run this when the customer clicks your check button, using the same client and result from step 1.
try {
  const check = await client.verify(result);
  const state = client.summarize(check.records);
  console.log(state);         // "complete", "partial", or "failed"
  console.log(check.records); // Each record includes match and actual_values
} catch (error) {
  console.error(error.code, error.message);
  // Show a retry message in your UI.
}
Verification results
complete
Every record matches
The DNS changes are visible to the lookup. Continue with your application’s routing and HTTPS checks.
partial
Some records match
Show which records still need attention so the customer can check those values.
failed
No records match
Show the values found in DNS and let the customer retry. A “failed” summary means no records matched; a failed API request throws an error instead.
The client checks for an exact match: each queried name must have exactly one value for the requested record type, and it must equal match_against. To allow other values alongside the expected one, such as multiple TXT records, use the check-records-exist API instead.
Each checked record includes match and actual_values. The latter is an array of values when DNS returns records, or false when no values are found. DNS updates can take time to become visible because of caching. A successful check confirms the DNS result; your backend should check the domain’s association with the customer, routing, and HTTPS before marking the domain connected.
Verify without the JavaScript client
From the browser, POST to https://cloud.approximated.app/api/dns/v2/token/check-records-match-exactly with Content-Type: application/json. Copy domain, host, type, and match_against from each returned record:
The address is domain when host is @, or host + "." + domain otherwise. Both check-records-exist endpoints also use address; the token variant additionally needs token in the body.
Keep the client alive while the customer follows the instructions. It attempts renewal every five minutes; each token lasts up to 10 minutes and 30 seconds, within the session’s 24-hour deadline. Call client.stop() when the setup component is removed or the flow is finished. Handle renewal errors with onError. After expiry or key replacement, stop the old client and create a new one with a fresh token from your authenticated backend.
Client methods and options
instructions(request)
Returns a promise
Fetches the provider details and setup steps. Takes the same domain and records as the API below.
verify(result)
Returns a promise
Checks all records from an instructions result. Also accepts an array of records with domain, host, type, and match_against (or value).
summarize(records)
Returns a string
Returns complete, partial, or failed from the checked records. An empty array returns failed.
stop()
Cleanup
Stops token renewal. Call it when your setup component unmounts.
renewToken() / getToken()
Token access
renewToken() requests a renewal and returns a promise. getToken() returns the current token.
createClient(options)
Configuration
Pass token. Optional api_url defaults to https://cloud.approximated.app/api/dns/v2. Use onTokenRenewed(token) and onError(error) to handle background renewal results. Request errors still need a try/catch.
Both endpoints return the same JSON. Send Content-Type: application/json and Accept: application/json. Choose authentication based on where your code runs:
The short-lived token returned by the token endpoint. Only include it on the browser endpoint.
domain
String · Default for all records
The domain to connect, such as customer.com or shop.customer.com. Required unless every record supplies its own domain. Use a domain with a registrable name and a TLD, such as example.com.
records
Array · Required
Send 1 to 25 records. You can include records for more than one domain; the response groups them by root domain.
records[type]
String · Required
A, CNAME, or TXT. Letter case does not matter; the response uses uppercase.
records[host]
String · Required
Use @ for the record’s domain itself, or a relative name with no trailing dot. With domain: "shop.customer.com", @ targets shop.customer.com and www targets www.shop.customer.com.
records[value]
String · Required
The IPv4 address, target hostname, or text you want in DNS. Any {domain} placeholder is replaced with that record’s domain.
records[ttl]
Integer · Optional
Cache duration in seconds. Accepts a positive integer or numeric string; defaults to 3600 when omitted. Use the returned step value for provider-specific display.
records[domain]
String · Optional override
Set this when a record belongs to a different domain than the top-level default. An omitted or blank value uses the default.
A successful request returns 200 with a domains array. Groups appear in the order their root domains first appeared in your request; records within each group keep their original order. Each group contains apex_domain, provider, and records.
Provider fields
These fields are inside each group’s provider object, for example result.domains[0].provider.name. All ten keys are present; optional links and images can be null.
Provider
name / provider_domain
Strings
name is the display name, such as “Cloudflare”. provider_domain identifies the provider in your code, such as cloudflare.com. The fallback is Generic / generic.
detected / supported
Booleans
detected means the nameservers matched a known provider. supported means provider-specific instructions are available. Neither flag promises automatic setup.
lookup_status
String
ok: the lookup succeeded. nameservers_not_found: no nameservers were found; check the domain. lookup_failed: the lookup could not be completed; offer a retry.
nameservers
Array of strings
The nameservers used to detect the provider. Empty when none were found.
message
String
A sentence you can show above the instructions. General instructions ask the customer to go to their DNS provider.
message_link
Object or null
An optional link with text and url to show alongside the message, such as information about a provider migration.
login_url / logo_url
Strings or null
A link to the provider’s DNS settings and a hosted logo, when available. Each can be null.
Record fields
These fields are inside each item in a group’s records array, for example result.domains[0].records[0].steps.
Record
domain
String
The supplied domain, trimmed and lowercased, with any scheme, path, port, or trailing dot removed. International domains use punycode: bücher.de becomes xn--bcher-kva.de.
apex_domain / subdomain
String / String or null
apex_domain is the root domain, such as customer.com. subdomain is the part before it, such as shop, or null for the root itself.
type / host
Strings
type is A, CNAME, or TXT. host is the host you supplied, with surrounding whitespace removed.
combined_host
String
The host relative to the root domain. For shop.customer.com, @ becomes shop and www becomes www.shop. For the value to display in the provider’s form, use the host step’s value.
value / match_against
Strings
value contains the requested value with any {domain} placeholder replaced. match_against is identical and is ready to send to verification.
ttl
Integer
The TTL in seconds, or 3600 when omitted. The steps contain the provider’s display wording.
title
String
A heading you can use above the record’s instructions.
automation
Object or null
When available: { "kind": "domain_connect", "url": "…" }. Open the URL to let the customer approve automatic setup with their provider. Otherwise, this field is null.
steps
Array of objects
The ordered instructions for this record. Render them using the step kinds above, or use the record data to write your own instructions.
Step fields
These fields are inside each record’s steps array. The kind determines which keys are present.
Step
kind / text
Strings · Every step
kind is text, link, or field. text is the sentence to show.
url
String · Link steps
The destination for the instruction’s link.
field
String · Field steps
Which record value the step describes: host, value, or ttl.
label
String · Field steps
The input’s name in the provider’s interface, such as “Name” or “Target”.
value
String · Field steps
The value the customer should enter or select. Keep it as text, including values such as “1 Hour”. An empty string means leave the field blank.
DNS Widget v2 uses the /api/dns/v2/ API and headless.v2.js client. New response fields may be added within v2, so ignore fields you don’t need. Breaking changes will use a new API path and client version; existing versions will keep their contract.
The instructions endpoints return the following error statuses. The client exposes API failures as ApxDnsError objects with code, message, status, and details.
API errors
401
API key endpoint
The API key is invalid. Check the key your backend sends in the api-key header.
403
Token endpoint
missing_token means the token property is absent. A present but empty, malformed, expired, or revoked token returns token_expired; this also covers a token of the wrong type. Obtain a fresh token from your authenticated backend using a current API key and create a new client. Renewal cannot restore an expired or revoked token.
422
Either endpoint
invalid_request or invalid_domain. Check details for the record’s zero-based index, field, and message. Request-wide errors, such as too many records, can have an empty details array.
429
Widget or API key endpoint
Widget requests return JSON error rate_limited and Retry-After: 60; wait 60 seconds before retrying. The general API-key limit of 240 requests per minute can instead return plain text. See request limits for the separate IP, cluster, and session budgets.
{
  "error": "invalid_domain",
  "message": "One or more records are invalid; see details",
  "details": [
    { "index": 0, "field": "domain", "message": "must be a valid hostname such as example.com or app.example.com" }
  ]
}
The client also uses network_error when a fetch fails, and request_failed for an unsuccessful response without a JSON error code. Calling createClient() without a token throws missing_token immediately. Handle request failures with try/catch and use the onError callback for token renewal failures.
Use v2 for token creation, the browser API, and JavaScript files:
Integration
Files
API
Scoped customer tokens
Your authenticated server endpoint
GET /api/dns/v2/token
Embedded v2
headless.v2.js, dnswidget.v2.js, and dnswidget.v2.css
/api/dns/v2/
Headless v2, including React and Vue
headless.v2.js
/api/dns/v2/
Customer sessions accept at most 25 A, CNAME, or TXT records per instructions request, with a valid domain, a non-empty host and value, and a positive numeric TTL when provided. Use @ for the entered domain; omit TTL to use the default of 3600 seconds instead of passing Auto.
Embedded v2 verifies the normalized records returned by the API. Verification events contain those check results; use match_against for the expected value. Call stop() before removing the widget during client-side navigation.
Security fixes and compatible patches may update a pinned version. Breaking changes get new asset names or API paths; existing paths will not silently switch to a newer version.
Approximated allows you to receive notifications about events happening with your virtual hosts by sending HTTP GET or POST requests to a URL you control.
Webhooks can be configured from your dashboard by logging in and navigating to the "Webhooks" section. A basic log history for each configured webhook is also available there.
Each webhook event includes an idempotent_key in its payload (e.g., "apx-whl-<integer id>"). This key is unique for each distinct event instance.
If Approximated needs to retry sending an event, the idempotent_key for that specific event instance will remain the same across all retries. You can use this key on your server to detect and deduplicate events, preventing accidental reprocessing of the same event.
For an added layer of security, you can configure each webhook with a secret string key in the dashboard.
If a key is configured, Approximated will include it in every webhook request sent to your endpoint via the webhook-key HTTP header. You can then verify this key on your server to ensure that the request genuinely originated from Approximated.
Approximated offers flexibility in how you route webhook events:
Single Webhook, Multiple Events: You can create a single webhook configuration (pointing to one URL) and have it trigger for multiple different event types (e.g., Virtual Host Created, Virtual Host Deleted). Your endpoint will then need to inspect the type and event fields in the payload to differentiate and process them accordingly.
Multiple Webhooks, Different Endpoints/Events: Alternatively, you can create several distinct webhook configurations. Each can point to a different URL or the same URL, and each can be configured to trigger for specific, individual events. This allows you to route different event types to different processing logic or microservices if needed.
Webhooks and their data are intended to be sent only to SSL/TLS encrypted endpoints. Each payload is not separately encrypted, so please ensure that any configured endpoints are setup with SSL/TLS certificates of their own.
Triggered when a new virtual host is successfully created through the API or dashboard.
Note: this event is triggered when a Virtual Host is added to your cluster but does not necessarily mean that the custom domain is successfully connected to the cluster yet.
Triggered when the configuration of an existing virtual host is updated through the dashboard or API.
Note: this event is NOT triggered by monitoring changes like DNS or SSL statuses changing.
To be notified of those changes, please use the
Virtual Host Monitor Updated event
.
Triggered when the active monitoring for each virtual host incoming address detects a change in the DNS, SSL, APX Hit, or resolving statuses.
Included for convenience is a 'changes' field that will provide the old and new values for any fields that have changed.
Note: this event is NOT automatically triggered by configuration changes made to a virtual host using the dashboard or API, though they may indirectly result in this event being triggered if statuses change.
To be notified of configuration changes to the virtual host, please use the
Virtual Host Updated event
instead.
Multiple IP addresses in DNS values: In some cases, monitors will find multiple IP addresses in the DNS records for a domain.
This occurs when there are either multiple records with different IP addresses, for the same host, or in some cases when a CNAME record is used to indirectly point the custom domain through another domain/subdomain.
Multiple IP addresses are not always an issue, particularly when combining Approximated Cloud with Self Hosted instances, but it can be an indication of improperly configured DNS records for a domain.
Edge Verify is invisible bot protection for your forms, built into your Approximated proxy.
There are no CAPTCHA puzzles for your visitors to solve, no third-party scripts, no keys to manage, and no cookies.
Unlike CAPTCHA services, there's also no server-side integration: no verification API to call, no SDK to install, and no backend changes.
Because Approximated is already your proxy, the edge validates submissions itself and blocks bad ones before they ever reach your app.
A small script, served first-party from your own domain by the edge, transparently proves that a visitor is a real browser using a background proof-of-work and environment signals.
It then mints a short-lived signed token (valid for about 10 minutes and refreshed automatically) that is bound to the visitor and domain, and is single-use.
The script injects the token as a hidden _apx_verify_token field into every form on the page, including forms added later by single-page apps.
When the form is submitted, the edge validates the token and either passes the request through to your app or blocks it.
Edge Verify blocks non-browser spam outright and makes automated abuse significantly more expensive, while staying invisible to your real users.
The scoring intentionally errs toward letting a human through, because a false block would break a real form submission.
Note: the script is served from your own domain by the edge, so there's no third-party URL and nothing extra to host.
Create an Edge Verify rule for your virtual host by logging into your dashboard and navigating to your virtual host, then More, then the Edge Verify tab.
You can also create rules for every virtual host at once from your cluster's panel.
A rule consists of:
Method and path: the form submission to protect, e.g. POST /contact.
Mode:monitor or enforce, described below.
That's it - there is no step 3. There's no verification endpoint to call from your server, no secret to store, and no code change in your app.
The edge blocks bad submissions before they reach your origin.
Every matching submission is checked and its outcome recorded, but nothing is ever blocked.
We recommend starting every rule in monitor mode.
Enforce
Submissions with a missing or invalid token receive a 403 response at the edge and never reach your app.
Running in monitor mode first lets you watch the stats and confirm that real submissions are passing before anything is blocked.
Anything that would trip up the widget, like broken javascript on a page or an unusual browser, shows up as data instead of lost submissions.
Once the passed rate looks right, flip the rule to enforce.
Everything you can do with rules in the dashboard can also be automated through the REST API, using the same headers and api-key as the
Virtual Hosts API.
Rule changes propagate to the edge automatically within about a minute.
Rules can be managed per virtual host, identified by its incoming address in the JSON body -
the same by-incoming convention as the
Virtual Hosts API endpoints.
All four endpoints are POST requests:
Delete a rule. The body takes the incoming_address and the rule id, and returns a 204 with no content.
Or cluster-wide, where a rule applies to every virtual host on the cluster.
The cluster is implicit from your API key, so there's no cluster id in the path:
Regular HTML form posts need nothing extra - the hidden _apx_verify_token field is injected for you.
If you submit with fetch or another javascript request instead, ask the widget for a token and send it in the X-Apx-Verify-Token header:
The Edge Verify tab shows an outcomes panel for each rule, with a chart and a time range picker, available per virtual host and for the whole cluster.
Submissions are counted by outcome:
Passed
The submission carried a valid token and went through to your app.
Missing
No token was present at all - typical of bots posting directly to your form endpoint without running a browser.
Invalid
A token was present but failed validation, such as a forged token or one bound to a different visitor or domain.
Expired
The token was valid once but too old by the time the form was submitted.
Replayed
The token had already been used for a previous submission.
The block rate shown is the share of submissions that didn't pass.
In monitor mode, that's the share that would have been blocked, which is exactly what you want to review before switching a rule to enforce.
The form must POST to the proxied domain. Edge Verify can't protect forms that submit to a third-party or un-proxied endpoint, because those submissions never pass through the edge.
Visitors with broken javascript or unusual browsers can't run the widget. In monitor mode these surface as missing-token data rather than lost submissions, which is another reason to start there.
If a legitimate form is being flagged, check with your browser's dev tools that the hidden _apx_verify_token field is present in the submitted form, confirm the rule's method and path match the submission exactly, and use monitor mode while debugging.
Because a rule is just a method and a path, and the token can ride a header, Edge Verify isn't limited to classic form submits.
A valid token proves the request came from a real browser running your page, so you can attach it to anything your frontend calls:
login and signup endpoints (against credential stuffing and signup abuse), comment and review submissions, votes, add-to-cart, or any JSON API behind your pages.
The mechanics are the same as any other javascript submission - send the token in the X-Apx-Verify-Token header as shown in
Fetch and JSON Submissions, and create a rule for the endpoint's method and path.
Two boundaries to keep in mind: this only applies to browser traffic, since mobile apps and server-to-server clients can't run the widget.
And plain page navigations aren't the target - the widget can't attach a token to a regular GET page load.
Edge Verify runs entirely first-party on your own domain. It sets no cookies, stores nothing in the browser, does no cross-site tracking, and sends no data to third parties.
That makes it a much simpler story for privacy policies and consent banners than third-party CAPTCHA services.
Edge Sequences let you inspect and change requests at the edge, before they reach your application. A sequence belongs to one
proxy cluster and can match traffic for any virtual host on that cluster. Use them to add headers, rewrite paths, redirect old
URLs, block unwanted requests, reroute traffic to a different origin, or apply rate limits.
Everything on this page is done from the dashboard: open Edge Sequences, choose the proxy cluster you want to
change, and edit an inactive draft before you make it current and activate it. To automate the same work, see the
Edge Sequences API.
A sequence has one or more matcher groups, which decide whether it applies to a request, and an ordered list of
rules, which run from top to bottom when it does. Sequences run before the cluster's normal virtual-host routing,
in the numbered cluster-wide order shown in the dashboard, so more than one sequence can act on the same request. Use the arrow
controls beside a sequence to change that order.
1
A request arrives
A visitor requests any virtual host on the cluster.
2
Edge Sequences run, in cluster order
For each sequence: if any of its matcher groups matches, its rules run from top to bottom. Otherwise the sequence is skipped.
A Blocker, Redirect, or Reroute rule answers the request right here. Nothing below runs.
3
Virtual host routing
Sees the request as the rules left it and forwards it to the virtual host's origin.
4
Your application
Handles the request. The response returns to the visitor through the cluster.
Changes made by an earlier rule, such as a rewritten path or an added request header, are visible to later rules, later sequences,
virtual-host routing, and your application. A terminal rule (Blocker, Redirect, or Reroute) answers the request
itself, so later rules and later sequences never run for it.
Choose the proxy cluster whose traffic you want to control.
Select Create Edge Sequence, give it a descriptive name, and save it. New sequences start inactive, with an empty draft.
Add at least one matcher group with at least one matcher. Without one, the sequence matches nothing.
Add one or more rules and arrange them in the order they should run. Without rules, the sequence has no effect.
Choose Save as current version while the sequence is inactive, then activate it when you are ready.
If you edit an active sequence, the dashboard creates a draft from its current version. The live version keeps serving until you
choose Deploy as current version. Saving or activating a version queues a cluster configuration update, which
reaches every region within about a minute.
when all of its positive matchers match, unless all of its negative matchers match too.
A matcher can be marked negative. With one negative matcher, the group simply skips requests that match it. With two or more,
they act as a single combined exception: the group only skips requests that match all of them at the same time. To
exclude requests that match any of several values, list those values in one negative matcher instead, for example several paths
in a single Path matcher.
Match All Requests makes its group unconditional and causes other matchers in that group to be ignored, so use it
by itself. A group with no matchers is ignored.
Rules run in the order they appear in the sequence. The last three below are terminal: they answer the request
themselves.
Headers
Add, set, or delete request headers before routing, and response headers before the response returns to the visitor.
Rewrite
Change the request path, query string, or HTTP method, then continue.
Rate Limit
Limit requests per visitor IP, or with one shared counter for all visitors. Needs a recent cluster image; contact support if you are unsure whether yours has it.
Blocker
Return a static response. Terminal.
Redirect
Return a redirect. Terminal.
Reroute
Proxy the request to a different origin and return its response. Terminal.
Terminal rules stop later rules and later sequences, so put a Blocker, Redirect, or Reroute last. The dashboard warns when a
terminal rule makes later rules unreachable, but does not reorder the sequence for you.
A Regex matcher tests a pattern against one request value, chosen under Match against: the path, the incoming
host, the query string, a request header of your choice, or the Edge Verify outcome. Give each matcher a short, unique name and enter a pattern using
RE2 syntax. Use ^ and $ when
the entire value must match; without anchors, a matching substring is enough.
Name
user_path
Match against
Path
Pattern
^/users/([^/]+)$
Capture groups are exposed to later rules as placeholders scoped by the matcher's name. The example above makes the captured user
segment available as {http.regexp.user_path.1}, and {http.regexp.user_path.0} holds the whole match.
Named groups such as (?P<slug>[^/]+) are available as {http.regexp.user_path.slug}. RE2 intentionally
does not support lookahead, lookbehind, or backreferences.
The dashboard checks that the pattern compiles when you save the matcher. That only proves the syntax is valid, not that the
matcher group selects the traffic you expect, so confirm changes with representative non-production requests before relying on
them to block, redirect, or reroute production traffic.
Draft: editable matcher groups and rules that do not serve traffic.
Current version: the saved definition that serves traffic while the sequence is active.
Historical version: a previous definition you can view, clone into a new draft, or make current again.
Version history covers matcher groups and rules only. A sequence's name, active state, and position in the cluster-wide order are
separate settings and are not restored when you make an older version current. Reordering or activating a sequence acts on its
current version even when a draft exists.
Nothing happens: confirm the sequence is active, has a current version, contains a matcher group with at least one matcher, and has at least one rule.
Too much traffic matches: check for a Match All Requests matcher, for extra groups (each one is another way to match), and for a regex that needs anchors.
Negative matchers surprise you: several negatives in one group only exclude requests that match all of them at once.
A later rule never runs: look for an earlier Blocker, Redirect, or Reroute rule, including one in an earlier sequence.
A restored version behaves differently: check its active state and cluster-wide order separately, because those are not versioned.
The Edge Sequences API automates everything the Edge Sequences dashboard
can do: block, redirect, rewrite, reroute, rate limit, or change headers on requests before they reach your app. Read that guide
first if you are new to sequences, matcher groups, and rules.
The API is declarative. A create or update request carries the full desired definition of a sequence, and the
edge is updated to match it. Every apply becomes a new numbered version, so you get version history and one-call rollback for free.
The cluster is implied by your api-key, so no path contains a cluster id.
An apply (create or update) validates the whole definition, stores it as the next version, and promotes that version live in a
single transaction. There is no partially-applied state. The previous live version moves into the version history, and so does
any unpromoted draft from the dashboard editor. Changes reach the edge automatically within about a minute.
Reads round-trip: the data object returned by any read or list endpoint is itself a valid apply payload, so you can
GET a sequence, change it, and POST it back.
Every apply also returns a warnings map, described under
Warnings. A definition can save successfully and still need your attention.
All endpoints use the same api-key header as the
Virtual Hosts API, and everything is scoped to the cluster attached to that key.
Sequences on other clusters return a 404.
The general API budget of 240 requests per minute per key applies to every endpoint. Writes (create, update, delete, activate,
deactivate, reorder, and version rollback) have an additional budget of 30 requests per minute per key.
Exceeding it returns a 429 with {"error": "rate_limit_exceeded"}. Reads and version listing only consume the general budget.
A sequence's matcher_groups decide which requests it applies to:
The sequence matches when any group matches.
A group matches when all of its positive matchers match.
A group's negative matchers form one combined exception: the group is skipped only when every negative matcher
matches at once. To exclude any of several values, list them in a single negative matcher instead. See
Build Matcher Groups for examples.
When a request matches, the sequence's rules run in array order.
Blocker, redirect, and reroute rules return a response and stop processing, so anything after them in the array never runs.
The API accepts such definitions but reports the shadowing in warnings.
Sequences themselves also run in a cluster-wide execution order (the order field), adjustable with the
reorder endpoint.
Required on create. On update, omit it to keep the current name.
description
String or null, optional
Free-form notes about the sequence.
active
Boolean, optional
Whether the sequence applies to traffic. Defaults to true on create. When omitted on update, the current value is kept.
dry_run
Boolean, optional, default false
When true, the definition is validated and all warnings are computed but nothing is written. The response is a
200 with "data": null. It must be a real JSON boolean: the string "true" returns a 422 with
invalid_type at /dry_run.
matcher_groups
Array, required, at least one group
Each group is {"matchers": [matcher, ...]} with at least one matcher.
See Matcher Types.
rules
Array, optional, default []
The actions to run, in order. See Rule Types.
A sequence with no rules saves, but has no effect and returns a warning.
Validation failures come back as a 422 whose errors map has one entry per problem location. Keys are
JSON Pointers into the payload you sent, so
/rules/0/config/max_events is the max_events field of your first rule, and the empty key "" is the
sequence as a whole. Each value is a list of problems, each with a stable code for your code to branch on and a
message for people. Warnings use the same shape.
A rule's returned config echoes the stored configuration, which can include server-computed keys such as
handler and injected headers alongside the fields you supplied. The whole object is accepted back on apply, so the
response stays a valid payload. A dry run ("dry_run": true) returns a 200 with "data": null and any warnings instead.
A read returns the same sequence object as above, with an always-empty warnings map. A list wraps the sequences with
cursors, which are non-null when more results exist in that direction:
A full replace, not a patch: send the complete desired definition and it becomes the next live version.
Anything you leave out of matcher_groups or rules is gone from the new version (though still in the version history).
name and active may be omitted to keep their current values.
Returns a 200 with the updated sequence (now "live_version": 2) and any warnings.
Rate limit counters survive updates, so an update does not reset limits mid-window (see
Rule Types).
Moves the sequence to a position in the cluster's execution order. The body is {"position": 0}:
zero-based, and clamped into the valid range, so a large number means "move to the end". Other sequences shift accordingly.
A missing or non-integer position returns a 422 with invalid_type at /position.
negative (optional, default false) inverts the match. Several negative matchers in one group combine
into a single exception; see How Matching Works.
data holds the fields for that type:
all
Matches every request. data is {} and may be omitted.
path
{"paths": ["/admin*"]} URL paths, with * wildcards. A missing leading slash is added automatically unless the path starts with a wildcard.
host
{"hosts": ["customer.example.com"]} Incoming domains on the cluster.
target_host
{"hosts": ["app.example.com"]} Matches every virtual host whose target hostname is in the list. The cluster binding is server-derived; a client-supplied psid is ignored.
header
{"header_keys": ["x-api-client"], "header_values": ["mobile app"]} Keys and values are paired by index and all must match. Keys must be unique and contain no spaces; values may contain spaces but not be blank.
query
{"query_keys": ["preview"], "query_values": ["1"]} Query string parameters, paired by index. Keys must be unique; neither keys nor values may be blank or contain spaces.
protocol
{"protocol": "http"} The request protocol.
client_ip
{"ranges": ["203.0.113.8", "198.51.100.0/24"]} Client IPs or CIDR ranges.
geolocation
{"allow_countries": ["US", "CA"], "deny_countries": []} Country codes. At least one of the two lists must be non-empty.
vars_regexp
{"name": "preview", "pattern": "(^|&)preview=1(&|$)", "match_against": "{http.request.uri.query}"} An RE2 regular expression tested against one request value. match_against is one of:
{http.request.uri.path} the request path
{http.request.host} the incoming hostname
{http.request.uri.query} the query string, without the leading ?
{http.request.header.User-Agent} any request header, by name
{http.vars.apx_verify_outcome} the Edge Verify outcome
Capture groups are available to later rules as {http.regexp.preview.1}, or by name for named groups. See Write and Validate Regex Matchers for placeholders and syntax.
name and description are optional labels for your own reference. They do not affect behavior.
config holds the settings for that type:
blocker
Returns a static response and stops processing.
status_code (string, default "403") and optional body.
redirect
Returns a redirect and stops processing.
location (required) and status_code (string, default "301").
Supplying top-level location replaces the response headers with just Location (plus the
edge's apx-hit marker), so any headers you also pass are discarded. To send custom headers with a
redirect, omit top-level location and put it inside the headers map instead:
Reverse-proxies to a different upstream and stops processing.
destination (required), port (integer, default 443), and host_setting, which
controls the Host header the upstream receives: "destination" (default), "incoming_address",
or "x_forwarded_host".
rewrite
Rewrites the request before later rules or your origin see it: optional uri and/or method.
rate_limit
Rate limits matching requests.
max_events (integer, required, 1 to 10,000,000), window (one of "10s", "60s",
"600s", "3600s"; default "60s"), and key_mode: "per_ip" (default,
a separate counter per client IP) or "shared" (one counter for all matching traffic).
Counters survive updates: state is carried over by pairing rate_limit rules positionally with the previous
live version's. The internal zone_token that identifies a counter is server-managed and is never accepted
on input nor returned.
Applies and dry runs return a warnings map for definitions that saved successfully but still need attention. It has the
same shape as errors: JSON Pointer keys into your payload, a list of problems per key, and the empty key ""
for the sequence as a whole. The map is empty when there is nothing to report.
Warning codes
shadows_later_rules
/rules/<i>
A blocker, redirect, or reroute rule has rules after it. They never run.
unreachable
/rules/<j>
The rule sits after a rule that returns a response. blocked_by points at that rule.
rate_limit_not_enforced
/rules/<i>
The cluster's current image can't enforce this rate_limit rule. It is stored and activates automatically when the image is upgraded.
no_rules
""
The sequence saved but has no effect until rules are added.
feature_disabled
""
Edge Sequences are not enabled for your cluster. Definitions save and version normally but won't apply to traffic until the feature is enabled (contact support).
"warnings": {
  "/rules/0": [
    {
      "code": "shadows_later_rules",
      "message": "redirect returns a response, so the rules after it never run"
    }
  ],
  "/rules/1": [
    {
      "code": "unreachable",
      "message": "rule 0 (redirect) returns a response before it",
      "blocked_by": "/rules/0"
    }
  ]
}
Version summaries do not include the definition itself. A version's draft flag is true for an unpromoted dashboard draft.
The cursors are opaque integers, not version numbers, and a cursor is null when there are no more versions in that direction.
To roll back, promote a historical version by its number:
curl -X POST https://cloud.approximated.app/api/edge-sequences/12/versions/1/activate \
  -H "api-key: your-cluster-api-key"
Returns a 200 with the sequence now serving version 1. Activating the already-live version is a safe no-op,
and a version number that doesn't exist for the sequence returns a 404.
A malformed pagination cursor. Returns {"error": "invalid cursor"}.
401
The API key used does not exist.
404
A sequence id that doesn't exist, belongs to another cluster, or is malformed. For rollback, also a version number the
sequence doesn't have. Returns {"error": "not_found"}.
422
Validation failed. errors maps JSON Pointers into your payload to lists of problems, as described under
The Apply Payload.
Field codes: required, invalid_type, empty, unknown_type,
invalid_regex, out_of_range, not_allowed, length, format,
and invalid for anything else. A write that could not be completed reports apply_failed,
activation_failed, or reorder_failed under "".
429
The write budget (30 writes per minute per key) was exceeded, returned as {"error": "rate_limit_exceeded"}.
The general 240 requests per minute budget also returns a 429, as plain text.
503
The regular-expression validator was unavailable, so an apply containing a vars_regexp matcher could not be
checked and nothing was written. This is a server-side, transient condition, not a problem with your definition: retry after
the number of seconds in the Retry-After header. The body carries regex_validation_unavailable under "".
MCP (Model Context Protocol) is a way for an AI assistant to work with another service. With Approximated's MCP connection,
you can ask your assistant to check a domain, look at traffic, or change a setting. You choose what it can access.
The app you use to talk to the assistant is called a client, such as Claude Code. It needs to support remote
HTTP MCP connections. Choose OAuth to sign in and approve access in your browser, or a token
to create a secret and paste it into your client's connection settings.
Server URL
https://cloud.approximated.app/mcp
Manage both kinds of connection on the
MCP tokens page in your Approximated dashboard.
OAuth lets you connect by signing in to Approximated in your browser. Use this option if your client supports MCP with OAuth.
Add https://cloud.approximated.app/mcp in your client's MCP connection settings.
Follow the client's sign-in link. Sign in to Approximated and complete two-factor authentication if it is enabled.
Check the client name, then choose which clusters it can use.
Select the actions it can take and approve the connection. Nothing is selected by default.
Return to your assistant and ask it to check its access.
Example prompt
“Show me which Approximated clusters and permissions this connection can use.”
To stop the connection later, open MCP tokens and select Revoke.
OAuth technical reference
Approximated supports OAuth client discovery, dynamic registration, authorization with PKCE S256, and rotating refresh tokens.
Access tokens last one hour. A compatible client refreshes them automatically. Revoking the connection invalidates both its access and refresh credentials.
The assistant can call whoami to confirm its effective clusters and permissions after connecting.
Name it so you can recognize it later, such as “Claude Code on my laptop”. Choose its clusters and permissions.
Choose Create token, then Copy token and save it securely. The full token is shown only once.
Paste the token into your client's authentication settings, using the server URL above. For Claude Code, choose Copy command in the dashboard and run it in your terminal.
Once you have saved it, choose Done — hide token. If you lose the token, create a replacement and revoke the old one.
Token settings and Claude Code command
Customer MCP tokens start with apxcmcp_. Clients that accept HTTP headers need Authorization: Bearer followed by your token.
The dashboard's Claude Code command uses this format. Replace the example value with your token:
Choose where the assistant can work and what it can do. These are separate choices, and no action permissions are granted by default.
Choose its clusters
Selected clusters limits the connection to the clusters you pick. All clusters you can access includes your current and future clusters while you have access to them.
Your own cluster membership is checked on every call. If your membership is removed, the connection loses access to that cluster, even if you selected it when you connected.
Choose its actions
Start with the actions needed for your task. For example, Clusters: View lets the assistant read cluster details, addresses, regions, and configured capabilities. Traffic analytics and request logs each need their own View permission.
View, Create, Update, and Delete are separate grants. Allowing an assistant to create or change something does not also let it view that feature. Allowing View does not let it make changes.
The assistant can always check its own access, read documentation, and suggest a feature after connecting. Other tools are hidden from its tool list if their required permission is missing.
Permission reference
In the dashboard, View is read and Run usually means execute. Running a request trace uses trace_requests:create. Cluster details require clusters:read.
A tool is a function the assistant calls to read or change something in Approximated. You describe the task in plain language; the assistant chooses a tool and supplies its inputs. Its available tools depend on your permissions.
Start by asking it to check its access. Each tool tells the client which inputs it accepts. If two clusters share a name, use the cluster ID. If a domain appears on several clusters, give the cluster ID or virtual-host ID.
Inspect domains and clusters
Ask which domains are configured, where their traffic goes, or which addresses and regions a cluster uses. This is a useful first step when investigating a setup.
Example prompt
“Show the configuration for app.example.com on my production cluster.”
Tools and inventory details
whoami reports the connection's effective access. get_vhost reads a domain's configuration, and get_cluster_info reads cluster details.
Cluster addresses and regions come from locally stored inventory at the last sync. Image capabilities describe the configured image.
Understand traffic and errors
Ask for traffic trends, response times, or the domains with the most errors. Request logs can help you inspect individual requests when logs are available on the cluster.
Example prompt
“Which domains had the most errors on my production cluster in the last 24 hours?”
Analytics, log limits, and time windows
Traffic analytics
Tools include traffic_series, traffic_top, latency_series, and vhost_rollup.
Series: at most 48 points. Top-value and virtual-host rollups: at most 50 items.
ASN breakdowns require a window of 48 hours or less.
Request logs
The request_logs tool returns requested and effective bounds, plus retention metadata.
Default window: one hour. At most 200 rows per page.
The requested span is limited to 720 hours and further bounded by the cluster's log retention.
Use next_cursor with identical absolute start/end bounds and filters for the next page.
Time windows
Supply either hours or paired start/end timestamps, never both. Absolute timestamps need explicit RFC3339 offsets, such as 2026-10-08T10:00:00Z.
These limits bound queries. They do not guarantee that data exists for the whole requested period.
Check DNS and help with setup
Ask whether a domain points to the right place, whether its certificate authority is allowed, or how to add its DNS records. The assistant can also issue a short-lived credential for the DNS Widget.
Example prompt
“Check the DNS records for app.example.com and explain what needs to change.”
DNS and widget tools
check_dns looks up DNS records. check_caa checks certificate-authority restrictions for a chosen cluster. get_dns_instructions generates setup instructions.
create_dns_widget_token requires the exact, unique name of an active API key on the chosen cluster and returns a short-lived widget token. See DNS Widget for renewal and revocation behavior.
Investigate a failing request
Ask the assistant to inspect a saved request trace or run a fresh diagnostic check. A trace sends a real request to your origin, so choose a method and path appropriate for your application.
Example prompt
“Send a GET request to /health on app.example.com and show me the trace.”
Trace and monitoring details
send_trace returns a trace ID while the request runs. Poll get_trace with that ID for completion.
list_traces returns at most 50 records.
Response bodies shown through MCP are capped at 10,000 bytes. Check body_truncated.
get_regional_monitor_checks reads regional results; run_regional_monitor_check runs a fresh check.
force_vhost_check runs a fresh domain health check.
Regional and domain checks require an existing URL monitor.
Some diagnostics require enabled cluster features and compatible image capabilities.
Change routing and integrations
With the matching permissions, an assistant can create or update domains, manage upstream origins, edit Edge Sequences or Edge Verify rules, and manage webhooks.
Example prompt
“Change app.example.com's target to origin.example.com on port 443.”
Configuration behavior
Upstream changes use the parent virtual host's permissions. Enable load balancing on that virtual host to serve its upstream pool.
Edge Sequence drafts, promotion, activation, ordering, and historical versions are separate operations. See Edge Sequences for how they affect traffic.
The permission reference above lists example tools and the separate grants for each action.
Look up documentation
The assistant can read Approximated documentation through the connection. It can also send a feature suggestion if a capability is missing.
Documentation tools and snapshot limits
list_doc_sections returns section IDs, source URLs, and the bundled snapshot's generated_at timestamp.
get_doc_section accepts up to five IDs.
search_docs needs at least two characters and returns up to ten matches.
Follow the source URL to compare the snapshot with the public docs.
suggest_mcp_feature sends feature feedback.
Rate limits and feature availability
The overall limit is 120 tool calls per minute per user, shared across that user's connections.
DNS, request-log queries, diagnostic requests, and monitoring also have their own limits. Request-log access and some diagnostics depend on the cluster's enabled features and image capabilities.
Check that the server URL is https://cloud.approximated.app/mcp and your client supports remote HTTP MCP. OAuth also needs a client that supports its sign-in flow. For a token connection, check the token value and Bearer header in the token settings above.
The connection says unauthorized or expired
Check whether it was revoked. An OAuth client may need to reconnect if it cannot refresh its credentials. If you lost a personal token, create a replacement.
A tool is missing or permission is denied
Ask the assistant to check its access with whoami, then compare the result with the permission reference. Reconnect with the missing action selected.
A cluster or domain is not accessible
Check the connection's cluster selection and your current membership. Use numeric IDs when cluster names or domain names are ambiguous.
Logs or diagnostics are unavailable
Check the cluster's enabled features, image capabilities, log retention, and whether the virtual host has a URL monitor. Try a shorter window. If a rate limit is reported, wait before trying again.
I want to stop a connection
Choose Revoke on the MCP tokens page. New calls using that connection will fail.
Removing your cluster membership removes access to that cluster. It does not revoke the credential or remove access to other granted clusters.
When a request for a custom domain reaches your application, you likely want to return content specific to that custom domain.
For example, if your app hosts blogs, the custom domain should return content for that particular blog.
The sections below should help guide you in making any changes necessary to your application in order to handle custom domains.
When a request goes through your Approximated cluster, it's relayed as shown below:
Approximated provides SSL encryption between the user and the cluster, but only your app or server can provide SSL encryption between the cluster and your app.
If your target address is a naked IP address, you won't be able to SSL encrypt a connection to it or use port 443 (typically reserved for SSL connections).
Luckily, most applications already have a domain or subdomain pointed at their application with an SSL certificate.
It depends on your app, but it's very likely you can simply re-use this as your target address for custom domains.
Approximated has a few ways that your app can determine the custom domain for a request.
(Default) Apx-Incoming-Host header
By default, Approximated will change the host header in each request to match the target address instead of the incoming address (the custom domain).
We've made this choice because often apps, servers, or reverse proxies are not ready to handle any domain but the primary app domain without modifications.
We always inject an extra header "Apx-Incoming-Host" to every request, which the app can use to determine the custom domain when it receives the request.
Keep the Host header as-is
Alternatively, you can set your proxy cluster to keep the Host header for each request as the incoming address instead of modifying it.
You can find this by opening your proxy cluster in the dashboard and changing the Keep Host Headers setting to True. This can be overridden for each virtual host, as well.
To do so, in the dashboard under advanced settings you can set Keep Host to True/False/Default. In the API, you can set keep_host to true/false/null to achieve the same.
Send the X-Forwarded-Host header
Finally, you can set your proxy cluster to add an X-Forwarded-Host header containing the incoming address for each request. This is independent of the other settings.
You can find this by opening your proxy cluster in the dashboard and changing the Send X-Forwarded-Host setting to True.
With statically generated content, you probably have folders and files sitting on a server for each custom domain.
For example, a request to mybloghost.com/some-blog will load the content directly from the /some-blog folder on your server.
In this situation, there's probably no code being run before that content is loaded directly from the files.
You might have caching, but the end result is the same.
For statically generated sites, the easiest way to integrate custom domains is likely to target that user's folder URL directly.
With Approximated, you can accomplish this by adding a path to your virtual host target address field.
For example:
Incoming Address:
someblog.com
Target Address:
https://mybloghost.com/some-blog
* Note the https:// in the target address is required when using a path
There are some obstacles to this approach, however:
Additional appended paths may not exist
All paths that are appended to to the custom domain will also be appended to the end of the target, which may cause issues in some cases.
Going to this URL: someblog.com/some-blog/some-post
Will reach this URL on your server: https://mybloghost.com/some-blog/some-post
This is probably what you want, so there's likely no issue here.
Example #2
Incoming Address: someblog.com
Target Address: https://mybloghost.com/some-blog
Going to this URL: someblog.com/assets/app.css
Will reach this URL on your server: https://mybloghost.com/some-blog/assets/app.css
If your application is using shared assets like app.css or app.js for all custom domains,
then your code is probably expecting to find them at:
mybloghost.com/assets/app.css
Instead of at:
mybloghost.com/some-blog/assets.app.css
In that case, this URL will 404 on the custom domain because app.css is not located there.
Solutions:
Symlink folders like assets in each statically generated folder. Typically your server will return requests to anything within as if they were actually there.
Set URLs for things like assets to be absolute in the generated HTML code.
For example:
href="https://mybloghost.com/assets/app.css"
Instead of:
href="/assets/app.css"
Note:
you may run into CORS policy issues with this approach.
See below for more information.
Assets on your primary domain may be restricted by CORS for custom domains
If you make a request to your main app, for instance to get assets, you may get a CORS error if you have a CORS policy restricting other domains.
Example:
Custom domain: someblog.com
Your app domain: mybloghost.com
Linking an asset like this: <link rel="stylesheet" href="https://mybloghost.com/assets/app.css" />
From a custom domain may result in a CORS error if you have a CORS policy restricting other domains from loading your app's content.
Solutions:
Allow all origins in your CORS policy for those URLs by setting it to the wildcard "*".
Note: this could have security implications for your application, please consider how loading this content on other domains might impact you first.
Provide those assets relative to your custom domain as well, either by generating them in each user folder or symlinking.
Use a CDN for assets that will allow your custom domains with CORS.
You won't need to install any additional packages (security team high five!) and the guide covers every aspect you'll need to know about custom domains in a Laravel app - from request to response.
That guide and repo show a working example that demonstrates creating pages that can be tied to a custom domain, the routing required, and a class that interfaces with the Approximated API for you.
Apps using Elixir's Phoenix framework can integrate with Approximated easily, including websockets for liveview.
We've created a comprehensive developers guide for supporting custom domains in Phoenix
to help you get up and running as fast as possible.
We've also created a companion example repo here
for you to explore and run easily.
The example repo is a simple blog hosting platform, where you can create blogs and tie them to a custom domain.
It should serve as a reference for how your Phoenix app can handle routing, liveviews/websockets, security features, and more for custom domains.
Next.js can be used with Approximated, whether you host it with Vercel or anywhere else.
We've created a comprehensive developers guide for supporting custom domains in Next.js
to help you get up and running as fast as possible, which includes examples using both the App and Page routers.
We've also created a companion example repo here
for you to explore and run easily, to get a sense of how Approximated could be used to integrate custom domains into your Next.js app.